2022-09-28

How do I password protect a .zip file in Ubuntu

9/28/2022 10:17:00 PM Posted by Hoàng Dũng , No comments


To zip a file with password run the following command:

zip -er name.zip folder/

It will show a prompt to enter a hidden password.


To unzip the file, run:

unzip name.zip

And enter the password you added before.

2022-09-25

How to Mount Microsoft OneDrive in Ubuntu

9/25/2022 09:38:00 PM Posted by Hoàng Dũng No comments

 OneDrive is a Microsoft cloud service that lets users securely store, share, sync, and access their files from anywhere at any time on all their devices. OneDrive has no official client available for Linux OS. However, there are some unofficial tools that let you access OneDrive files via your Linux File Manager.

Today, we are going to show one such tool “Onedriver” that let you directly access your OneDrive files on your Linux system. Note that Onedriver is not a sync tool. It allows access to all of your OneDrive files and downloads only those files which you want to use. Any changes you make in your OneDrive automatically reflects in your local OneDrive directory.

This article covers how to mount Microsoft OneDrive in Ubuntu using the Onedriver utility. This article also covers how to install the Onedriver utility on Ubuntu 20.04 and 21.04 LTS machines.

Method#1 Installing Onedriver through Repository (For Ubuntu 20.04)

In this method, we will install the Onedriver utility on Ubuntu 20.04 through jstaf/onedriver repository. This method may not work for Ubuntu 21.04. So for Ubuntu 21.04, you can follow the second method. Follow the steps below to install the Onedriver utility on the Ubuntu machine:

1. Onedrive utility is not by default available in Ubuntu. You will need to add the repository to install it. Add Onedriver repository through the command below in the Terminal:

$ sudo add-apt-repository ppa:jstaf/onedriver

Then hit Enter key to continue adding the Onedriver repository.

Adding jstaf/onedriver Repository

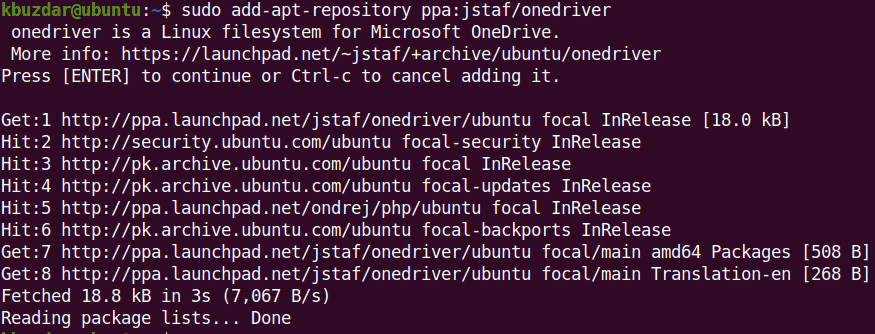
2. Then update the local repository index through the command below:

$ sudo apt update

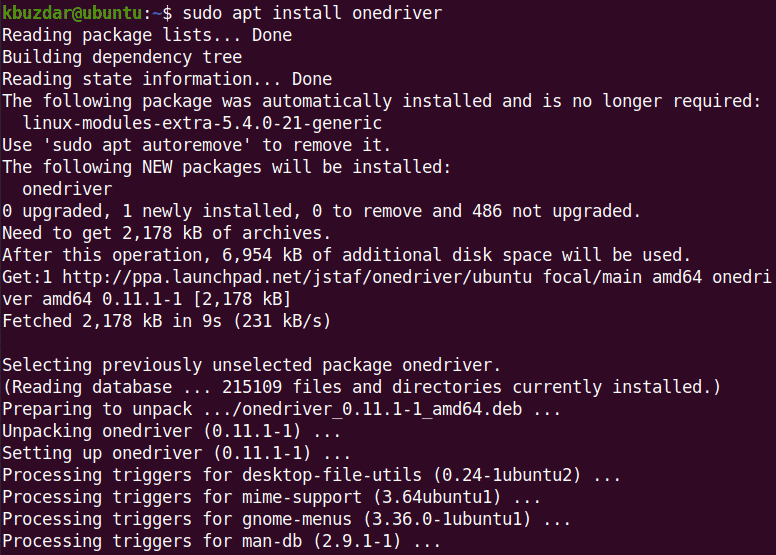
3. Now in order to install Onedriver on your Ubuntu system, run the command below:

$ sudo apt install onedriver

This command will install the Onedriver utility on your system.

Installing Onedriver utility through repository

Method#2 Installing Onedriver through deb package (For Ubuntu 20.04 & 21.04 & 22.04)

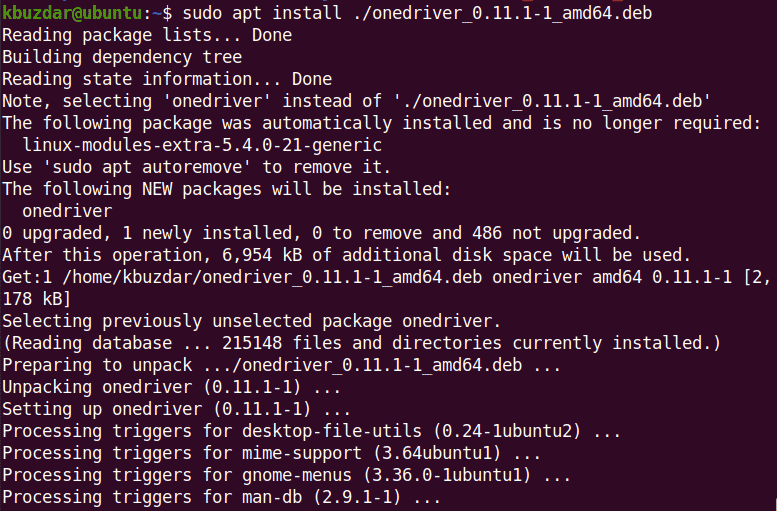
In this method, we will install the Onedriver utility on Ubuntu the deb package available on the Onedriver repository page. This method works both for Ubuntu 20.04 and 21.04. Follow the steps below to install the Onedriver utility on the Ubuntu machine:

1. Download the Onedriver .deb file using the command below:

$ wget https://launchpad.net/~jstaf/+archive/ubuntu/onedriver/+files/onedriver_0.11.1-1_amd64.deb

2. Then run the command below to install the Onedriver utility on your Ubuntu machine:

$ sudo apt install ./onedriver_0.11.1-1_amd64.deb

This command will install the Onedriver utility on your system.

Installing Onedrive utility throug deb file

Mount Microsoft OneDrive in Ubuntu

To mount your OneDrive storage on your Ubuntu machine, you will need to create a mount point directory. Let’s create a mount point in our Home directory through the command below:

$ mkdir myonedrive

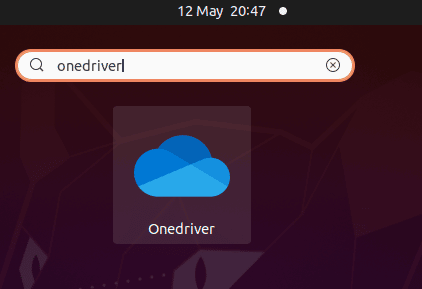
After creating the directory, launch the Onedriver utility from the Applications menu. Or you can search and launch it by pressing the Super key and typing onedriver in the search bar.

launching onedriver utility

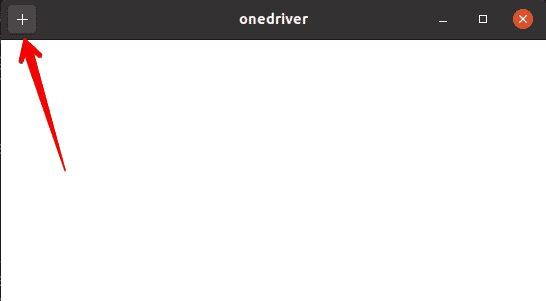
Once the Onedriver utility is launched, you will see the following default blank window. Now click the + button to add the mount point.

Onedrive default interface

Then select the mount point you have created in an earlier step and click the Select button.

Select Mountpoint

Now you will be asked to sign in to your Microsoft OneDrive account. Type your id and click Next.

Sign-in to OneDrive

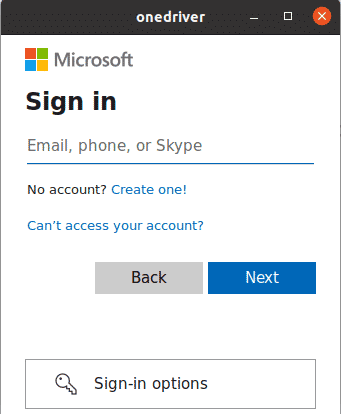
Then type your password and click the Sign in button.

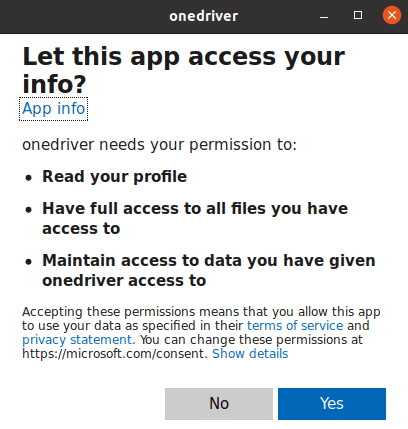
Then the Onedriver utility will ask for your permission to access your OneDrive files and data. Click yes to allow permission.

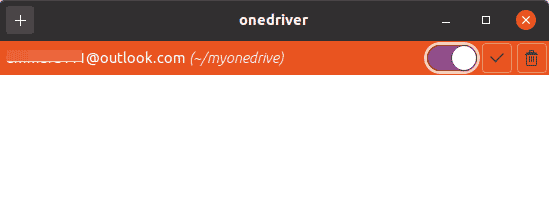
Now if you open your Onedriver utility, you will see your Microsoft Onedrive account listed in it.

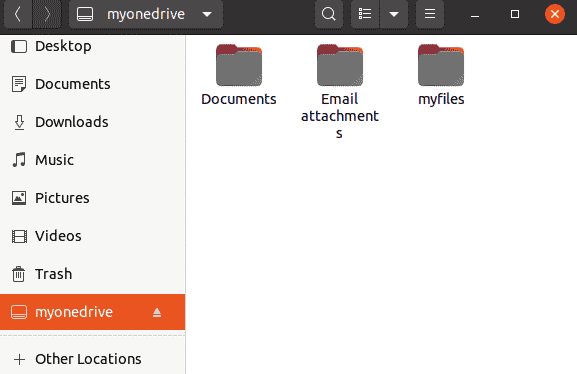
If you open your File Manager, you will see the Onedrive mounted in the sidebar. By clicking this directory, you can access your Onedrive files. You can also access your Onedrive files by navigating to this directory from your Terminal.

Unmount Microsoft OneDrive

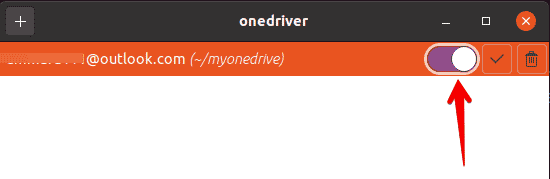
To unmount your Microsoft OneDrive, open the Onedriver utility and move the slider as shown below. This will unmount your OneDrive account which you can also confirm from your File Manager.

Remove/Uninstall Onedriver

If you no longer need the Onedriver utility on your system, you can remove it through the command below:

$ sudo apt remove onedriver

Onedriver utility lets you access your OneDrive files from Ubuntu File Manager as if they are part of your local system. This article covered how to mount Microsoft OneDrive in Ubuntu OS using the Onedriver utility.

@Source: https://tinyurl.com/msu9c6bv

2022-09-20

FIX lỗi mất dual boot khi cài song song Ubuntu 22.04 với Windows 11

9/20/2022 10:50:00 AM Posted by Hoàng Dũng , No comments
Brief: Can’t access Linux in dual boot because your system boots straight to Windows without showing the Grub menu? Here’s what you can do.

Method 1: Move Grub up the order

One of the reasons why a dual boot system boots automatically into Windows is because Windows boot manager has the priority in the boot order.

You need to access the boot settings. Restart your system. When the computer is booting up and shows the logo of the manufacturer, quickly press F10/F12 or F2 keys to access the boot menu or settings.

The keys defer from manufacturer to manufacturer. You can cycle through theme one by one, quickly to avoid multiple booting.


Quickly press F2, F10 or F12 keys at the screen showing your system manufacturer’s logo

Some systems will show a boot menu with the possible boot options under the boot tab. If you are lucky, it will show the boot options like this:


Make sure that Ubuntu is above Windows in the boot order

If you can see both Windows and Linux boot options and Windows boot is above Linux, you have to change the boot order.

You should see the option to access boot settings. Access it. In here, identify the Linux boot option. Select it and move it up the order using F5 key. After that press F10 to save and exit. Helpful keyboard shortcuts are always displayed in the boot menu.

If you are lucky, this should fix the issue for you. If a few weeks or months down the line, the problem comes again after a Windows update, you can use this same method here.

But if there is no Ubuntu/Linux option in the boot menu?

Method 2: Add Linux boot entry in the boot settings

One other common issue that many people encounter is the absence of Linux grub entry from the boot options. This means that in the boot settings, there is only Windows, no Linux option.

If it is the same case with you, go to BIOS settings. Under the boot tab, look for the Add Boot Option.


Add new boot option

It should give you an option to add an EFI file.


Browse to EFI file

I used this while installing Debian Linux. This is why you’ll see Debian in the screenshots here. For you, it should show the name of your Linux distribution like Ubuntu.

There is an EFI directory with efi files related to the operating systems on your computer i.e. Windows and Linux.


Select EFI directory

It should show a folder with your Linux distribution’s name along with some other folders. Select the Linux folder.


Select Debian

In this folder, you’ll find files like grubx64.efi, shimx64.efi. Select shimx64.efi.


Select shim.efi

You may give this file an appropriate name that is easily identifiable. The final screen may look like this.


new boot option

Adding the new boot option with efi file
Now, you should have this boot option. Since I named it Debian, it shows two Debian boot options (one of them coming from the efi file I guess). Press F10 to save and exit the BIOS settings.


New boot option added

When your system boots now, you should see the grub screen now.

Note: In Acer and perhaps some other systems, adding a new boot option could be tricky. You may use the steps mentioned in the fix for ‘no bootable device found’ error. There also a boot option was added but it requires changes from the security tab.

What you did here can also be done from Windows command line. Only try it when your settings are not taken into account.

Method 3: Set Linux boot for EFI from Windows (last resort)

Warning!

Playing with your boot settings can leave your system messed up. I advise having a recovery disk or Windows installation disk with you to reverse boot settings. Keeping the Linux live USB can also help in many situations.

Step 1
In Windows, go to the menu.

Step 2
Search for Command Prompt (type CMD), right click on it to run it as administrator.

Step 3
This is strictly for Ubuntu. Other distributions might have some other folder name.

In here, copy and paste the command below:

bcdedit /set {bootmgr} path \EFI\ubuntu\grubx64.efi

You don’t need to enter a password or anything like that. The command should run just fine given that your account has admin rights.

Step 4
Restart and you’ll be welcomed by the familiar Grub screen. I hope this quick tutorial helped you fix the Grub issue.

No success? Revert the changes
If the above method didn’t change anything, reverse the changes. If you are not able to boot do not panic.

Access the boot settings when your system is booting. In here, go to the boot options and move Windows boot up the order. Save and exit.

Now when you boot into Windows. you can reverse what you did using the command below with command prompt opened as admin:

bcdedit /deletevalue {bootmgr} path \EFI\ubuntu\grubx64.efi

Next, use the below command to set the boot back to Windows.

bcdedit /set {bootmgr} path \EFI\Microsoft\Boot\bootmgfw.efi

If you’re not able to boot into the Windows installation, insert the Windows installation disk and there you’ll have access to the command prompt.